Friday, May 24, 2013

Garden Words

To Plant a Garden is to believe in tomorrow.....

This was a fun little project to add words of inspiration to my garden. It was easy peasy and just a little messy - but so worth it!

You can find the kit to make your own garden words online. Search for "The Make Your Own Marker Stone Kit" or "Magnetic Poetry Make Your Own Word Stones."  Amazon had plenty of options.  http://www.amazon.com/Magnetic-Poetry-Make-Stones-6071/dp/B000WWFH9U

Supplies needed: quick set concrete, cement colorant, wheel barrel, trowel for mixing, drop cloth such as heavy plastic to work on, water, gloves, molds and letter kit.


Step by step instructions:
1) Decide what you'd like your markers to say before you mix your concrete..  Names, house numbers, or simple positive thoughts, such as "joy, blessings, welcome, love" make excellent choices. Once the concrete is mixed you will want to get right to work.  You have plenty of time, but with it being quick set concrete you want to keep things moving at a good pace.

2) Mix the concrete according to the package directions. Only add a little bit of water at a time, thoroughly mixing it in before adding more. You don't want your mix to be too wet. To make a few stones at a time, mix the concrete in small batches.  I mixed the concrete with my hand, but you may want to use a trowel.
  Add colorant to desired color. Kneed the colorant into the concrete until it is uniform throughout.


3) Fill your molds.  Be sure to press the concrete into the corners and smooth the surface.


4) Position your letters by laying them gently on top of the concrete.  Do not press them in until you have them spaced where you want them. 

5) Press the letters into the moist concrete. You may need to wiggle them a little bit to get a nice deep letter. Remove them immediately. If the letters do not hold their shape when you remove them, your concrete is too wet and you should remix the batch of concrete, but again move quickly so the concrete does not start to set.

 5) You can add embellishment such as small stones, gems or even cut shapes into the concrete using cookie cutters (such as this star).  Gently remove the mold and allow to dry, or cure, for 24 hours.


Bundle garden words up with raffia and wrap them in burlap for a nice garden gift.  Your friends will love them!


Wednesday, May 15, 2013

Camp Tarzan

This year my daughter's high school did the Disney Musical Tarzan. It was one of the first high school productions of Tarzan in Ohio and it was quite spectacular! The talent, costumes and stage design were amazing.  The director is incredible.  She has vision and isn't afraid to tackle the unknown, plus she includes everyone that tries out. It was a cast of 80 and everyone had a great time.

My daughter played the part of Young Tarzan

Tarzan and Jane

The gorilla costumes were handmade by volunteers from black sweat pants and black sheets. Perhaps I will do another post on how to make the gorilla costumes. 

One of the ideas the director had was to provide a "pre-show" event prior to the Saturday evening performance and she asked me to head it up. The event would serve as a way to draw children to the show as well as help raise some funds to pay for the production.

As we were brainstorming for the event, someone threw out the idea of trying to get the Columbus Zoo to come and bring some "jungle" animals.  It was a long shot, but we started making the connections and before we knew it, the zoo was booked and they were even donating their presentation to help us out.

Once we had the zoo lined up I had to think how to best organize the rest of the event so it wouldn't be utter chaos. Considering we were going to have 150 young children plus parents and grandparents, I thought the best way to handle the crowd was to design  the event much like a carnival. Thus, I began coming up with "jungle" type carnival activities and lining up volunteers.

The musical itself began at 7:30pm in  the high school auditorium.  Camp Tarzan was held in the gym (which was right across the hall from the auditorium) and tickets had to be purchased in advance.  The zoo did their presentation from 5:30-6:00pm with the carnival activities running from 6:00-7:00pm.  We charged $5.00 per child.

The entry way to the gym was decorated with ripped up sheets, ivy and paper flowers. I had photo boards for kids to stand behind for a photo ops and jungle music playing in the background.  


When the kids arrived at the entrance they were each given a brown bag with a checklist of activities on the front.  The checklists were in different order on the bags so that not everyone started at the same activity.

The Columbus zoo was definitely the highlight! 
They brought a penguin
and a sloth
and an armadillo
.......a big yellow snake
and my favorite, a snow leopard

The Jungle Carnival
When the zoo was done with their presentation the kids were instructed to try and go to the activities in the order listed on their bags.  This helped keep the kids spread out at different activities so no one had to wait too long in line. Jungle type prizes were given out at all of the activities except those in which the kids made something (such as the binoculars and necklaces)

Jungle Snack Necklaces:  Kids laced Fruit Loops and pretzels on a string that was threaded with a plastic lacing needle


Binoculars:  I made binoculars out of toilet paper tubes and let the kids decorate them with jungle stamps, markers and jungle stickers. It was so fun to see the kids use them during the musical.

Swamp Fishing: We decorated one of the schools ticket booths to look kinda "swampy." The kids dropped a fishing line, with a clothes pin on the end, behind the booth. A volunteer sat in the ticket booth and attached prizes. Prizes for this booth included plastic snakes, frogs and jungle tattoos.

Jungle Flower Ring Toss: This was a last minute game.  I was at the thrift store and found 2 of these peg boards.  Not sure what they were originally for, but they worked perfect for a ring toss game.  I attached flowers to the pegs with green electrical tape and provided swim pool diving  rings for the kids to toss.

Pin the Tail on the Monkey: This is pretty self explanatory   I painted two monkeys on white paper. The kids were blindfolded and had to try and "pin" the tail on the monkey.  The tail was a fluffy boas I bought at the dollar store. I cut it in half to make 2 tails then wrapped the end with electrical tape. Large glue dots were placed on the end so  the tail would "pin" to the monkey.


Wild Animal Toss: I used the school's batting screen for this game.  We decorated the screen with ripped sheets.  The screen had an opening perfect for tossing stuffed animals through. Since my kids are out of the stuffed animal phase I went to the thrift store and picked up stuffed monkeys, lions, gorillas, etc. to toss.  

Tree Frog Throw: I made a large tree out of brown paper and leaves that I ordered from Oriental Trading Co. The kids tossed a sticky frog at the tree trying to get it to land on a leaf.

Elephant Peanut Push: The kids had to push a peanut (in the shell) using a swim noodle, down a path marked on the floor with painters tape.  At the end of the path was a bushel basket laid on its side that the kids had to push the peanut into.


Banana Guessing Game: I ordered banana runts online and filled 3 jars, each with the same amount of bananas.  Each child could guess one time.  Since all 3 jars had the same amount, it made it easier and gave us the opportunity to announce 3 winners.  The winners were announced during the musical intermission. Their prize was the jar of bananas.


Tarzan Swing: This worked so well!  A rope was tied to the poles of the basketball hoops.  The kids had the opportunity to swing like Tarzan.  I had tumbling mats on the floor and an adult supervising at all times.


Face Painting: What is a carnival without face painting?  I had  art students and some cast members do the face painting.  Some had butterflies, snakes and monkeys painted on their faces, while others went all out and got leopard spots.  Too Cute!


Jungle Obstacle Course: This worked really well too. The kids went 2 at a time.   I set up an obstacle course by taping paper logs to the floor, used a towel as quick sand, a 2x4 as a fallen tree and field tile (we had in the barn) as a cave.  They were given a monkey they had to carry around their neck throughout the obstacle course.
 

They started by hopping from log to log, jumping over the quick sand, walking down the fallen tree....

........then crawling through the cave.


Character Photo Ops: We had members of the cast roaming around the carnival greeting the kids and posing for pictures.  We did this because we wanted to make sure the kids were not afraid of the cast since some of the costumes were pretty intimidating to a young child.

Even the school superintendent posed with a group of cast members.


Although it was a lot of work to coordinate it was a grand success.  Everyone had a great time and we made a little money as well.
Note: Be sure check out my post on How To Make A Gorilla Costume for detailed instructions on how to make these great gorilla costumes  http://grassybranchfarms.blogspot.com/2013/09/how-to-make-gorilla-costume.html

Sunday, May 5, 2013

It's May Again - that means it's Lyme Disease Awareness Month.....

......and once again, I feel the need to share with you some information about Lyme Disease.  You need to be aware of how to protect yourself from ticks (with bug spray containing at least 25% DEET.)  as well as the early symptoms of Lyme Disease. The black legged tick (also known as the deer tick,)  the one that causes Lyme Disease,  is the size of a poppy seed or the period at the end of this sentence. The black legged tick is in every state.  Don't let any doctor tell you otherwise.  It is just that some states are more "up" on things than others.

Here is a crazy long article for your reading pleasure, or perhaps reading horror - as it may scare you.  It is full of information about this crazy creature, the black legged tick, and why it is reeking havoc on the human race.

THE RISE OF THE TICK

With incisor-like claws that can tunnel beneath your 
skin in seconds, ticks are rapidly becoming the world’s 
scariest purveyors of deadly pathogens. Carl Zimmer 
walks into the woods to find out why these tiny beasts 
are skyrocketing in number – and outsmarting 
scientists with every bite.

http://www.outsideonline.com/outdoor-adventure/science/Feeding-Frenzy.html?page=1


and here is an awesome video produced by Dr. Needham, of the Ohio State University. It was made by the Ohio Division of Natural Resources.  The introductory information on ticks and how Lyme disease spirochetes get from white-footed mice to you is very well explained.

The young outdoorsman. Josh, who tells of his experience with Lyme disease, is very articulate, appealing and clear. Every doctor and outdoors loving person should see this video.

http://www.interfaceaudio.com/joshfinal-20130227-092733/joshfinal.html

and for lots more information about the signs and symptoms of Lyme Disease, how to properly remove a tick, and how to protect yourself and your yard, refer to my May 2012 post

http://grassybranchfarms.blogspot.com/2012/05/may-is-lyme-disease-awareness-month.html


Sunday, April 7, 2013

"With My Whole Heart" Window


I have had this old window frame above our bed for a while now and decided it needed a new life. 

So this is what I did ---- 
I cut a piece of heavy brown paper from a roll of floor paper (not sure the name of it, but you can find it at Home Depot,  it's the stuff they put down on floors to protect them when they are finishing up a house.) Anyway, I cut a piece the size of the window frame. 

Then I modge podged old sheet music to the brown paper. 

Once that was dry I free-handed my words in place with pencil, making  sure the words fit between the panes. Then I traced over and shaped the words with a thick black sharpie. 

I stapled the paper to the back of the frame and walla - a whole new look above our bed. 

It was that easy!


Monday, April 1, 2013

"Hit or Hold" - An Egg Cracking Good Game

In my family, Easter is first and foremost about the Resurrection of Jesus Christ. Easter is a day of celebration because it represents the fulfillment of our faith as Christians.  My family celebrates Easter Day by attending Morning Mass as a family (all 20 plus of us - we take up a whole pew) then heading back to mom and dad's to enjoy a fabulous family meal.  By the time we are done eating we are stuffed to the brim and ready for an afternoon nap.  BUT that doesn't happen...... 

Several  years ago my sister-in-law learned a new game from a co-worker and decided it might be fun for our family to give it a try.  Needless to say it has become an O'Reilly Family tradition.  

-Hit or Hold - An Egg Cracking Good Game-

This is how it works -
* Choose one family member to be the moderator.  This person will draw the game bracket, provide the slips of paper for numbers, flip the coin, and keep track of the bracket winners..  The moderator can also play the game.
* All ages are welcome to play (this year our players ranged from 18 months to 93 years old)
* Each family member is to bring a hard boiled egg to the family gathering.  


* The eggs cannot be raw or frozen (only hard boiled)
* Egg decorating is encouraged - but nothing can be used to strengthen the egg shell (so that means no gluing of fabric or other materials on the egg and no use of hard acrylic sealers or polyurethanes,  etc.  Eggs found to be in violation of this rule are automatically disqualified.


* Contestants take turns drawing a number from a basket.
* A game bracket is made (depending on the number of participants sometimes a lucky person or two will have a bye).  Contestants are placed on the bracket based on their number.
* The first set of contestants are called to the center of the room
* One of those two contestants  is asked to call the coin toss
* The moderator flips a coin.  The winner of the coin toss gets to choose "Hit" or "Hold."  

* What does "Hit" or "Hold" mean?  It means you get to choose if you want to be the person hitting your egg against the other person's egg or if you want to hold your egg and let them hit your egg.

* Rules of "Hitting" and "Holding"  -  Your egg must be exposed.  Your hand cannot protect the egg in anyway.  You can hold your egg top to bottom or sideways.  You can hit top to bottom or sideways.  Just as long as your hands are not disrupting the hit.  You cannot hold anything else in your hand (such as a napkin, sweater sleeve, pillow, etc.).  The egg must be presented in it's truest form. 

* Once the person who makes the call says "Hit" or "Hold,"  the game is a go and the "Hit" or "Hold" action is taken..  The person's egg that cracks is out.  The winner of that round is moved up on the bracket and the game continues until there are only two uncracked eggs left.  Surprisingly, one egg will always crack and one will not. The last two eggs compete for Champion.

* The Champion of the game is the person's with  the only uncracked egg in the room. 


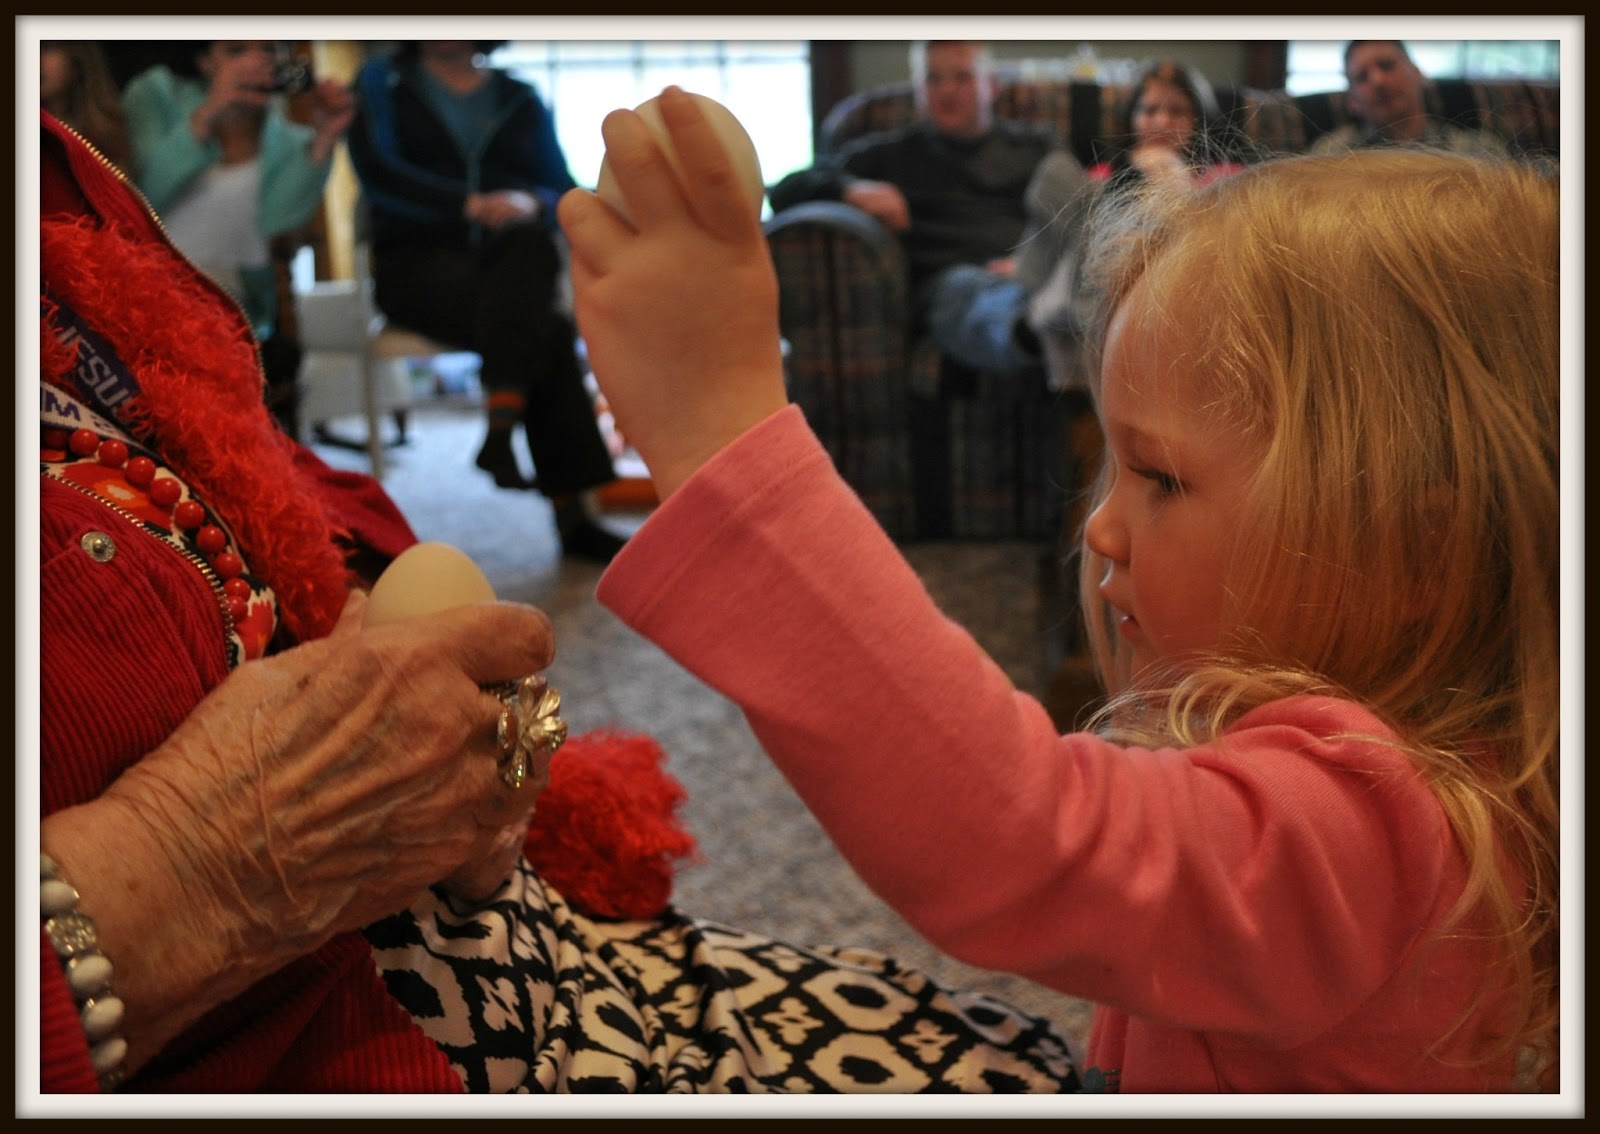
Little Erin getting ready to hit Great Grandma's egg

Erin was a bit concerned that her egg cracked, but we all cheered good job anyway!!

Battle of the spouses!
Jeff & Maggie competed in the final round together.  

And the winner is.....Jeff!

Uncle Jeff was a good sport and shared his prize basket with the kids!


** Update: Each year brings new things to our Egg Cracking Party.
Here are a couple of the decorated eggs from 2015.


We also added a rotating trophy last year.  It was made from a recycled 4-H trophy.