We finally got our concrete counter top done for our kitchen island. Let me just say it was a lot more work than I anticipated and it would have been very frustrating without the help of our friends from Concrete Contracting Solutions (Chris & Kevin Paisley).
But it turned out amazing and I love it.
Read on to see our DIY project come to life.
Thus, I began by going to our local Home Depot and ordering Quickrete Concrete Counter Top mix and gathered our other supplies: melamine board, charcoal colorant.and silicone caulking. In the mean time I contact our friend Chris who owns a concrete business and asked if he had ever made a concrete counter top. He hadn't, but was interested in learning and wanted to help with our little project. And we were glad to have his help!
 |
| We purchased 6 bags of the mix based on the size of our counter and the directions on the bag. The bags were about $12 each. This was special order so any extra was not returnable - we have 2 extra bags. That's OK, I am excited to find a project to use them for. Perhaps concrete flower boxes:) |
 |
| To begin with we measured and remeasured the size we wanted the island top. Then Bob and Todd began to cut the melamine board to make our form. Melamine board is ideal for this project because it is very smooth. |
 |
| We used drywall screws to put the form together. |
 |
| Next we caulked the seams. We did not use painters tape around the caulking as the link suggested. But in the end we think this might have been a good idea. |
 |
| Smoothing the caulking |
 |
| Todd cutting old fence to use for support in the concrete. |
 |
| The first time we used the colorant, Chris mixed the colorant with water before adding it to the concrete mixer. We later decided this wasn't necessary and just added it to the concrete as it was mixing. Figuring out how much colorant to use was a little tricky. We started by just adding a little to see how dark we could get it. I wanted the counter to be a dark charcoal, so we used 4 bottles of colorant. In the end I wish we would have used more. |
 |
| Pouring the concrete into our little mixer. |
 |
Making sure the concrete was the correct consistency.
It should be about the consistency of a Wend'y Frosty. |
 |
| Pouring our first batch into the form. The directions on the link we were following suggested using a release agent on the boards before pouring in the concrete. We didn't feel this was necessary so we skipped this step and the form came off just fine. |
 |
| Spreading the concrete in the form |
 |
| We had to make several batches of concrete so it was tricky to get the color the same with each batch. In the end we blended the batches together as we spread it around in the form. |
 |
| We placed a piece of old fence in the concrete for reinforcement. |
 |
| We pushed the fence down into the concrete and also added some re-bar for extra reinforcement. |
 |
| Adding more concrete on top of the fence. |
 |
| We smoothed the concrete with a board making sure to tap the sides and bottom to get the concrete down in the form. |
 |
| This is actually the underside of the counter, but we still wanted it to be nice and smooth. |
 |
| Bob added bolts to the counter as a way to hold the counter top in place on the island. The counter top is about 400 pounds so we knew it wouldn't move very easily, but we want some way to keep it from shifting.. The bolts are not fastened to the island, but sit in the corners of the island top's frame. |
We let the concrete sit for about a week before we removed the forms. I was really excited to see what things looked like once we took the forms off.....
 |
| It didn't look too bad. |
 |
| The edges were a little rough. |
 |
| Just a few air pockets that made little holes on the top or so I thought..... |
 |
Until Todd started rubbing over the light colored spots. Then lots of little air pockets popped and we had a ton of little holes on the top. Now what? That's when I called in the experts.
Thank goodness for friends in the concrete business! |
 |
| Chris and his brother showed up with some ideas...... First they sanded it to make sure all the air pockets were opened up. |
 |
| Making concrete dust |
 |
| They took things down to floor level to make it easier to work on . |
 |
| Then they made a mixture of cement and a little sand with a rapid set acrylic polymer (basically glue) added and skim coated the hole thing to fill in all the holes. |
 |
Everything was filled...now we needed to let it dry and harden - and hope all the holes were filled in
Click on "read more" to see the finished project.
|
 |
Here is a picture of the dried skim coat.
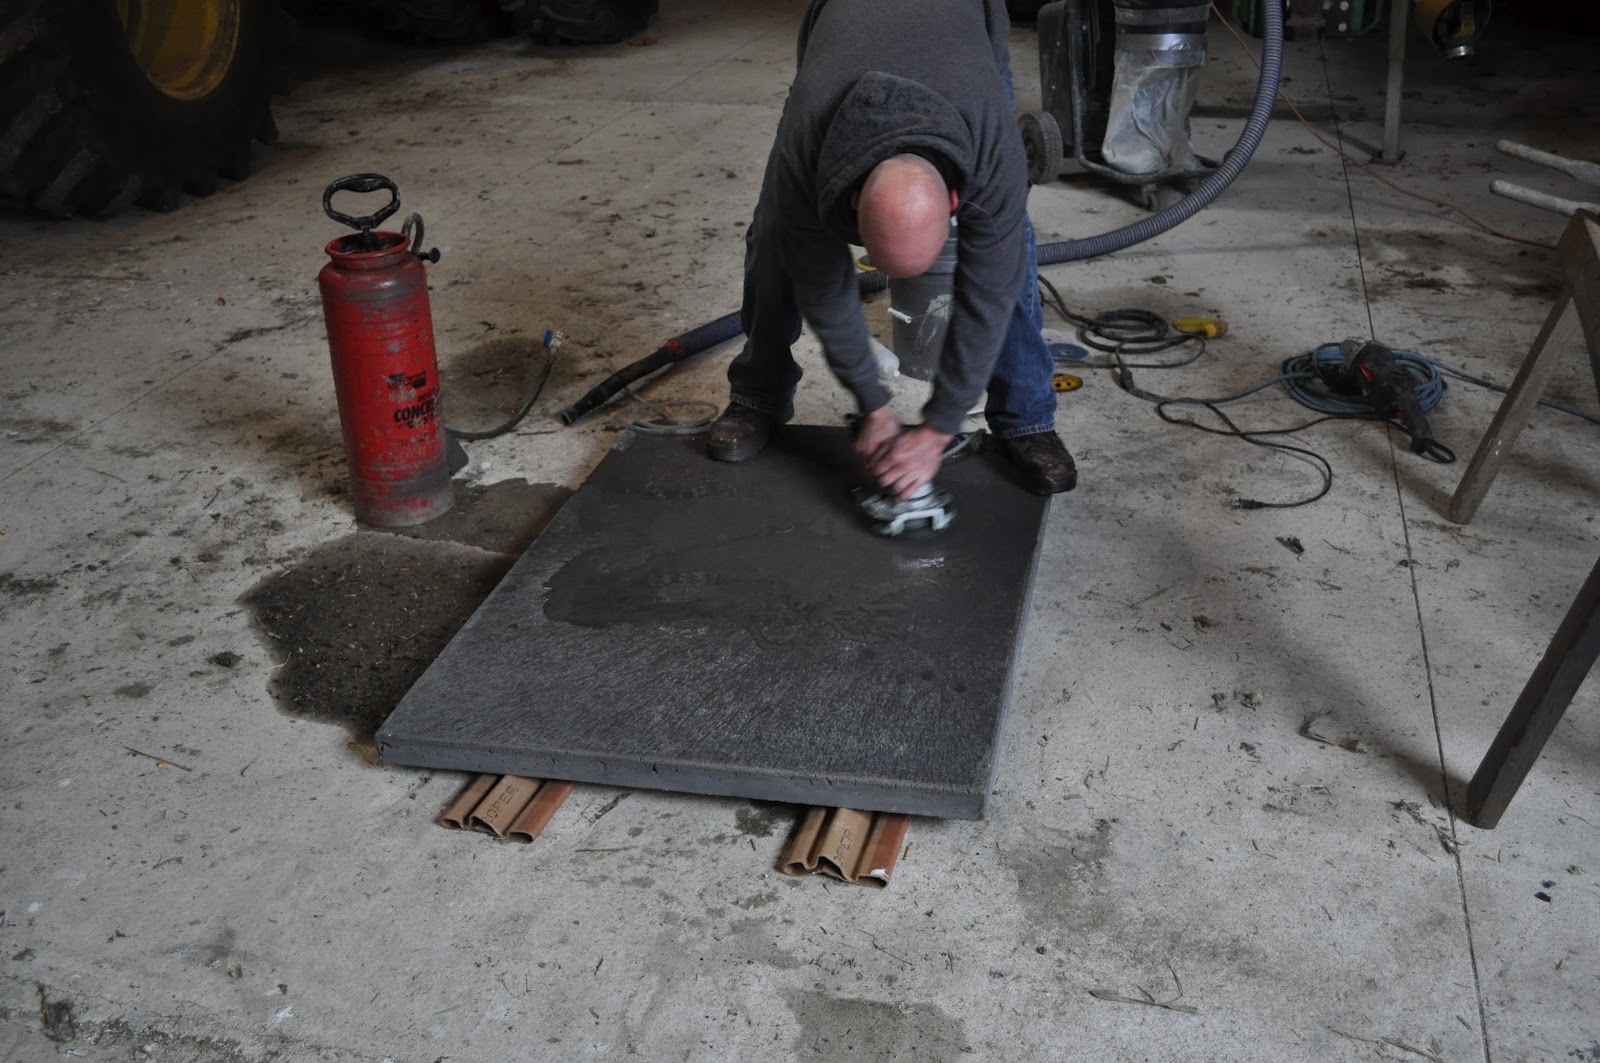
It was time to begin the sanding process. Chris set us up with several levels of diamond grit sand paper. Beginning with 50 grit we sanded off the skim coat. |
 |
| Since this was supposed to be a project for my husband and me - I insisted on doing some of the sanding. |
 |
| I sanded..... |
 |
Chris sanded....
Kevin sanded....
we all sanded - a lot! |
 |
| Unfortunately we still had a few holes pop up. Since this was a kitchen counter top and I would be using it for food, I wanted all the holes filled in. So Chris used a product called Vexcon, a filler that mixes with the concrete dust when sanding and then hardens. We had to do this a couple times, but eventually all the holes were filled and we could move onto the final sanding process. |
We sanded using each grit of sand paper until that level of sand paper no longer made dust.
 |
| We couldn't move onto the 400 level until all the scratches were gone. The scratches were hard for me to see so Chris and Kevin had to touch it up. If we would have moved onto the 400 level of sand paper while there were still visible scratches they (the scratches) would show in the end. |
 |
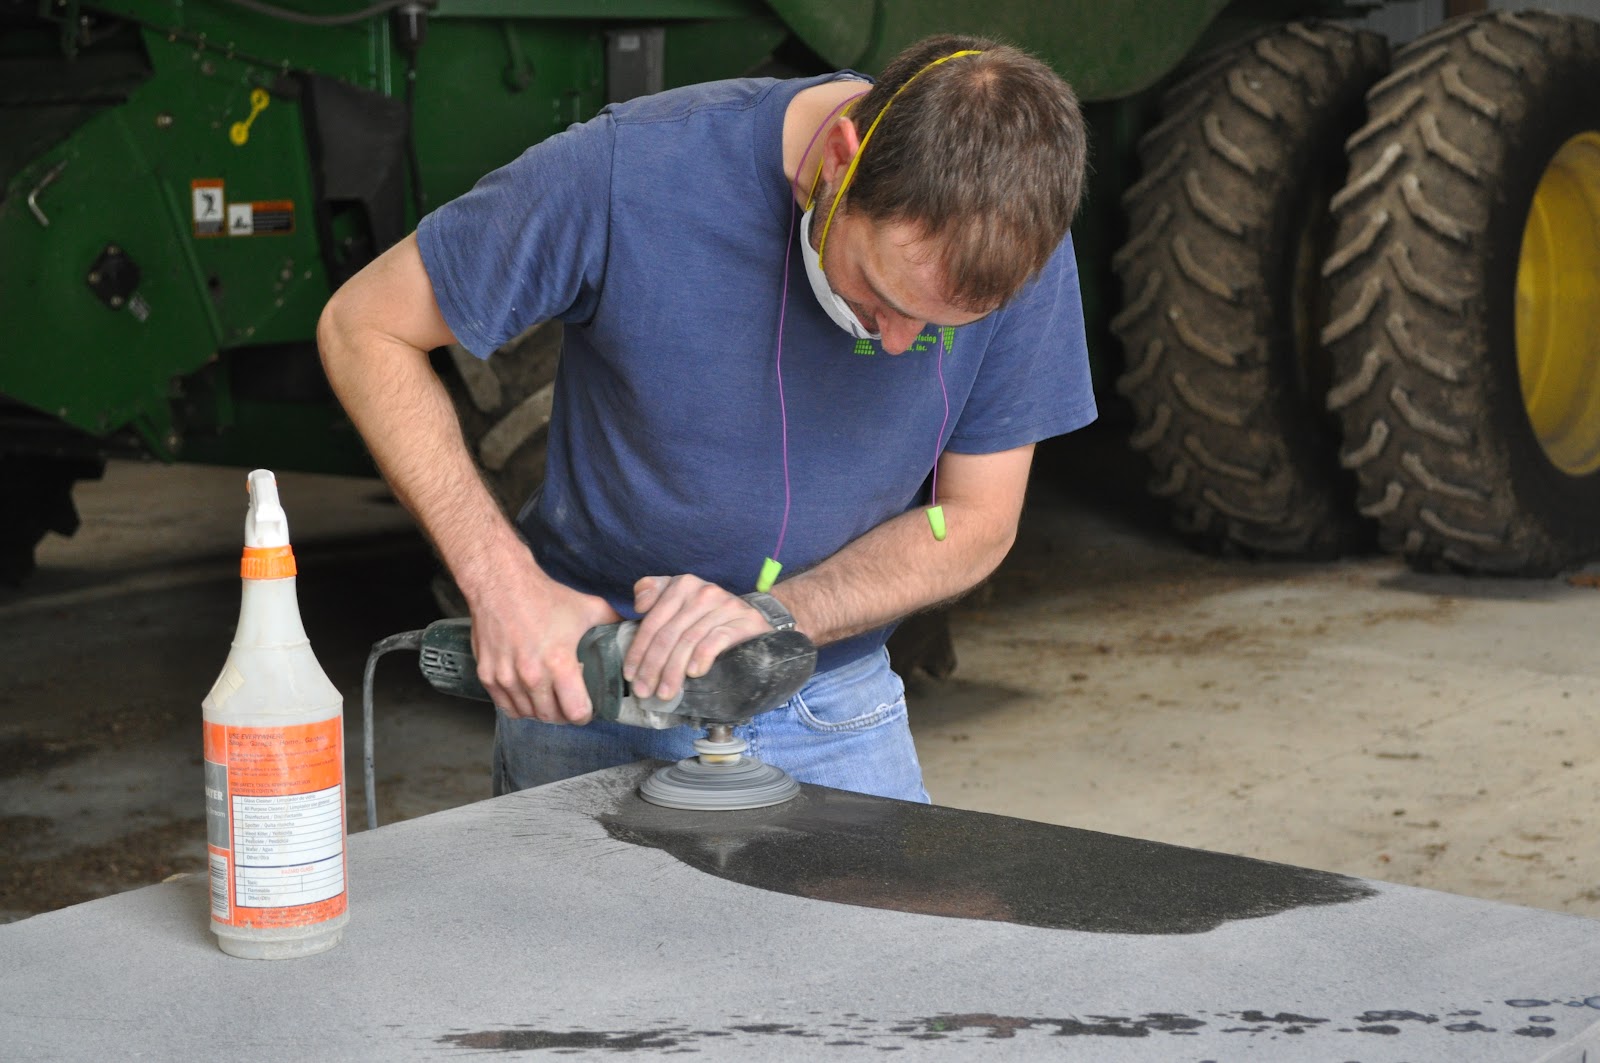
| The sanding was a long process. One morning I worked over 4 hours just sanding with the different levels of sand paper. 200, 400, 800.... My arms and hands felt like jello at the end of the day. |
 |
| The shine is from the polishing of the concrete using the different levels of diamond grit sand paper. |
Eventually we moved up to the 1500 grit |
 |
| The final sheen was achieved by sanding using a 3000 diamond grit sand paper. |
 |
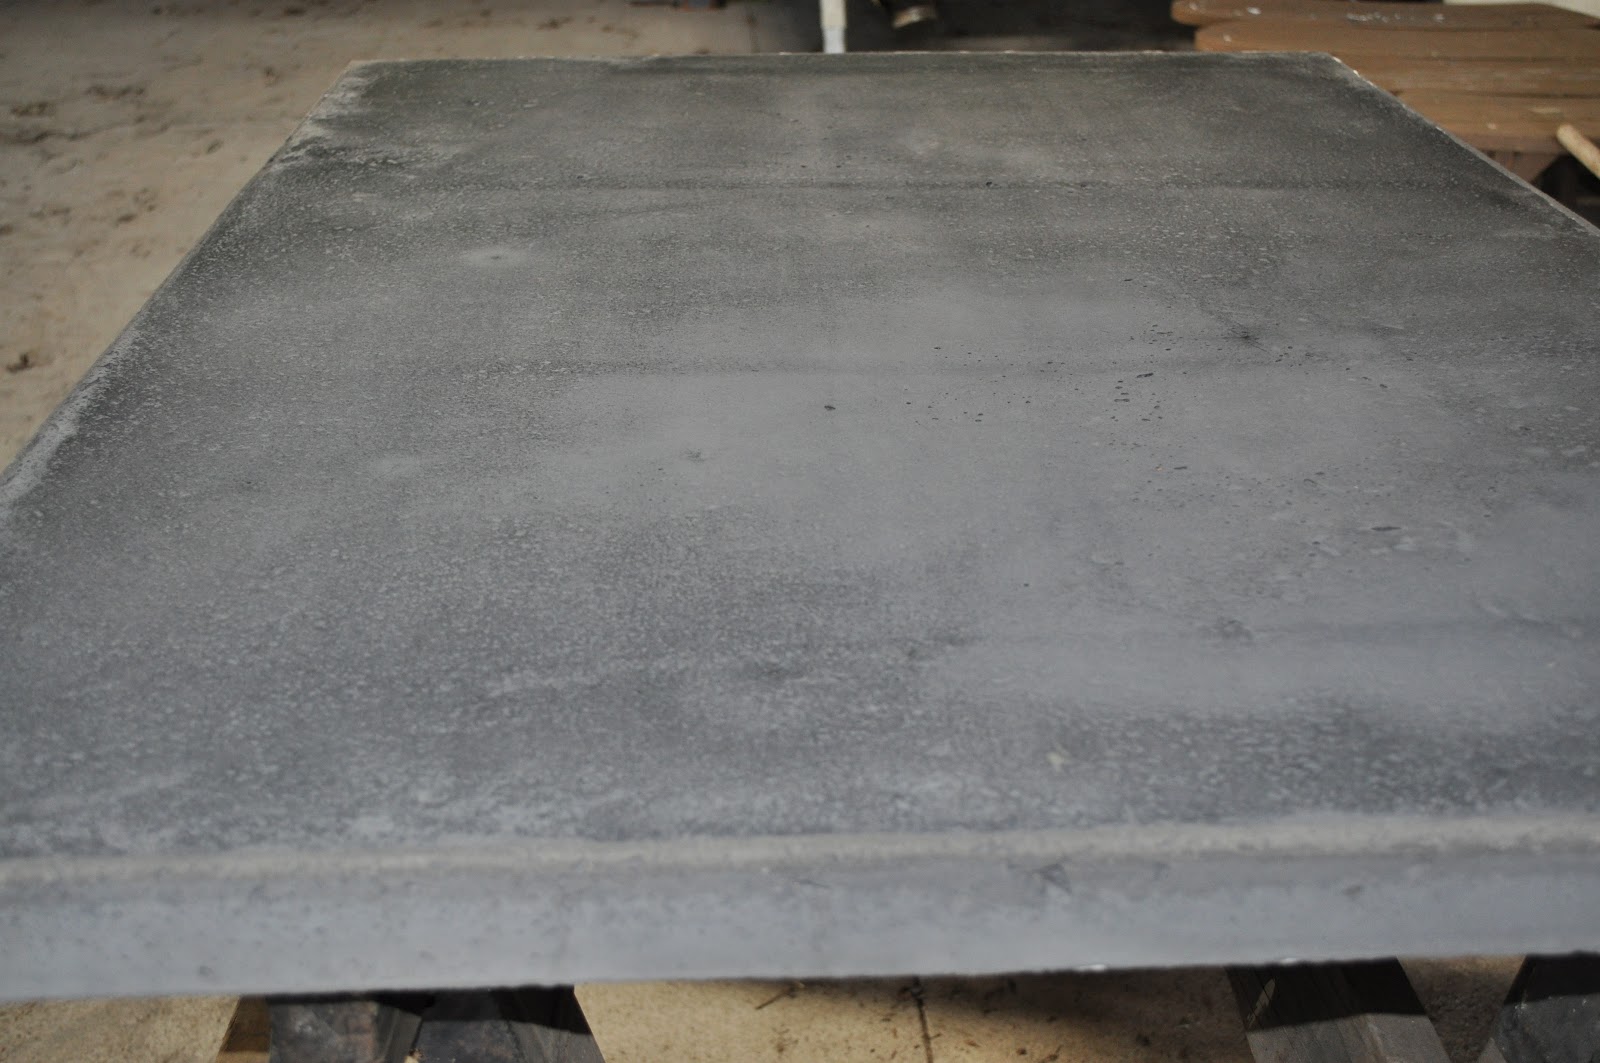
Finally, the counter top was ready to move into the house. I washed it real good to get all the dust off and decided not to seal it until we got it in the house. It took 3 strong men to carry it in. Once in the kitchen and set in place, I sealed it with a penetrating sealer. That wan't my original plan. I thought we were going to seal it with a glossy sealer to give it the shine. But Chris convinced me that the way we did it was better.
It was a lot more work, but less maintenance in the long run and I like maintenance free! |
So here it is.....although I had hoped the color would be darker -
I love it!
Oh, the island was custom made by another friend, Lamar Ratliff.
He does amazing work if you ever need a piece of furniture made
.


Thanks for sharing Lisa. The counter looks amazing!
ReplyDeleteIt’s amazing to see this from start to finish. :) I’m also impressed that you worked well with the colorant as well because, we both know that’s very tricky. You have to control the water to produce a consistent result. Also, you have to be consistent with the curing, as the inconsistency in color is more evident in colored cement than in the gray one.
ReplyDeleteLike what Salvatore said, consistency is important! I know it’s not easy to make a concrete counter-top but with patience and determination, everything will turn out fine. Congrats!
ReplyDelete-Alphonse Daigle
This was a nice project and bonding time for Bob and Todd. I also like that Todd is diligent in working with the cement. The need to get your measurements right is crucial with concrete projects, and I think you understand that very well. Congrats and good luck on your future projects!
ReplyDeleteHow many hours of sanding did it take? BTW it looks great.
ReplyDeleteI quit counting after 4 hours. The was broke up into segments so it is hard to calculate, but probably 6 or more.
DeleteLike what Salvatore said, consistency is important! I know it’s not easy to make a concrete counter-top but with patience and determination, everything will turn out fine. Congrats! granite countertops vancouver
ReplyDeleteSuch a wonderful sample of countertops very impressive, actually it reminds me the blog of NJ granite countertops, keep on posting!
ReplyDeleteA great an amazing idea of concrete counter-tops with pretty well designs. Hot food tables
ReplyDeleteThanks for share this nice information! Your Sound is really good about "DIY Concrete Counter Top". I am intimidated by the excellence of information. There are a bundle of good funds here. I am sure I will visit this position again soon.
ReplyDeleteI think, Ready mixed concrete is concrete that is pre-mixed and can be referred to as, concrete that is manufactured at a batching plant or factory.
Here is some information about concrete supply.
I am totally amazed that you used regular concrete to create a counter top! The finished product almost looks like some kind or marble or granite. This is something that I could totally pull off. How long did it take to make from beginning to end?
ReplyDeleteDexter | http://www.novacut.com.au
Dexter |
Great Post !!
ReplyDeleteEnjoy reading your easy diy countertops ideas.
This is Amazing! Me and my husband want to do this to our island. Can you tell me around how much the total cost of this was?
ReplyDeleteThis is Amazing! Me and my husband want to do this to our island. Can you tell me around how much the total cost of this was?
ReplyDeleteWhat kind of sealer did you end up using? We're in the middle of pouring cast in place concrete countertops right now and I'm so confused on which sealer to use...there are a lot to choose from and it looks like each one has its pros & cons!? Thanks.
ReplyDelete