Thursday, December 5, 2013

Baseball Snowman Ornament


Isn't this just the cutest ornament 
for your little baseball player ?!
Quick and easy - only 4 steps....


1. Find an old baseball or softball (a new one will work too, I just like the look of a worn ball)

2. Hot glue a piece of twine to hang your ornament.....drill a hole in the ball (first locate the place on the ball that you want to make your face, then move up from there to mark the place for your twine hanger). Tie a piece of twine in a small knot.  Put a dab of hot glue in the hole, then insert the knotted end in the hole. 

3.With permanent markers draw on the snowman's eyes, nose and mouth.  I start with the nose. This gives me a better idea of how to place the eyes and mouth. I always think eyes look better close together just above the nose.

4. Find an old piece of greenery and a red berry or two and hot glue them onto the snowman's head like a little halo wreath.


For a personal touch - write your player's name on the bottom or back of the snowman ball then add the year for each year they play ball.


Tuesday, November 26, 2013

"Popping" Popcorn Christmas Ornament

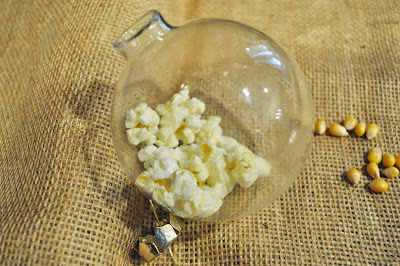
How did the popcorn get in the glass ornament???

 
It's fun and easy!  
Do this as an activity with children 
or package it up and give it as a gift.

Supplies:
Clear glass Christmas ornaments
Popcorn
Ribbon (optional)


Remove the shiny top from the glass ornament.
Add popcorn kernels to the glass bulb.  I placed about 40 kernels in the large glass bulb and 20 in the smaller bulbs.  Not all the kernels will pop, so don't be afraid to add a few extra.


Place glass bulb with the opening up in a microwave safe bowl.  Use a bowl that will hold the bulb so the opening stays pretty much upright.


Microwave bulb with popcorn kernels on high  for 1 minute and 10 seconds

 Careful - glass will be hot.  Shake out any un-popped kernels


Put top back on the glass ornament and tie with a ribbon.  Hang on Christmas tree.


This also makes a fun gift packaged with instructions.


Popcorn Ornament
Remove the shiny top
Place me in the microwave
Until you hear me pop!


Instruction:
Remove the shiny top.
Secure glass bulb upright in a small microwavable bowl.
Heat on high in the microwave for 1 minute and 10 seconds.
Glass will be hot - carefully shake out un-popped kernels.
Put top back on glass bulb and tie with a ribbon.
Hang on tree.

Tuesday, November 5, 2013

Yummy Pumpkin Roll

Have you ever had an Amish made pumpkin roll?  If you have, I am sure you will admit, they are amazing! Well the recipe I am about to share comes pretty darn close.  And it is not too difficult to make.  Rolling it up may be a little intimidating to some, but a little plastic wrap and the freezer takes care of all those imperfections - trust me!


Pumpkin Roll 
3/4 cup flour
2/3 cup pumpkin
3 eggs
1 tsp baking soda
1/2 tsp cinnamon
1 cup sugar
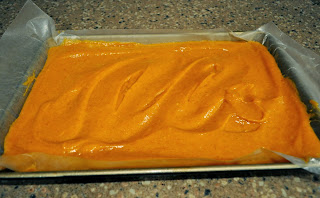
Mix well.  Line jelly roll pan with greased wax paper. 
Pour batter in prepared pan.  Bake 375 for 10 minutes
Filling
1 cup powdered sugar
8 oz cream cheese (room temperature) 
2 TBSP butter or margarine (melted)
1/2 tsp vanilla
Cream together


 Line jelly roll pan with greased wax paper

  Pour batter in prepared jelly roll pan

 Spread a towel out on your counter.  
Use a tightly woven cotton towel, not terrycloth. 
Sprinkle 1/4 cup sugar on the towel.

 Bake on 375 for 10-12 minutes or until done.


After you remove the cake from the oven, 
flip it upside down on the sugared towel.

  Gently remove the wax paper

While the cake is still kinda warm, 
spread the cream filling over the entire surface.

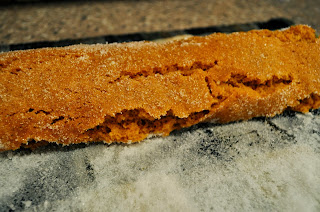
 Now the tricky part - don't be afraid.....using the palm of both hands gently roll the cake up.  (I could only demonstrate with one hand since I needed the other to take the picture. This will get a little messy and the cake will crack. )

 See the cracks?  They won't be noticeable when you serve it, trust me. 
On the counter immediately next to your towel, spread a large piece of plastic wrap.  Now gently pick up the entire roll, be sure to have a good hold on both ends, extending your fingers across as much of the surface of the roll as possible, and place the roll on the plastic wrap.

Sometimes I cut the roll in half (as shown below), and freeze it as 2 smaller rolls, depending on what I have planned for it. When you wrap the plastic around your pumpkin roll, pull it tight.  This will help pull those cracks together. Then wrap the pumpkin roll again on aluminum foil. Place in freezer until ready to serve.


 Cut and serve while it is still cold.

 Yummy!


Friday, September 27, 2013

How to Make a Gorilla Costume

Last spring our local high school did an awesome job with their performance of the musical "Tarzan".  The talent was amazing but the set and costumes were absolutely incredible.   Credit for the set and costume design goes to a  very talented young man in our community by the name of Patrick Bryant.  There were 25 or more gorillas in the cast and each costume was made by hand.  I helped  with the making of  at least a dozen pairs of gorilla pants, so I thought it would be fun to share how the gorillas came to life. With Halloween coming up I thought this could be a fairly inexpensive costume to make for a party.  It is a little time consuming, but worth it!


Supplies
* pair of black sweatpants
* black t-shirt (somewhat fitted)
* black sweatshirt or loose fitting t-shirt
* flat black sheets  (2 twin size should be enough, buy the cheapest - you're gonna rip them up anyway)
* hot glue gun & hot glue

Step 1: RIP SHEET.   Begin by ripping the sheet into large strips.  About 12 inches and then the length of the sheet. Rip the first sheet with the grain and the second sheet against the grain.  This will give your "fur" different effects. (Ugh! I wish I would have taken pictures of this first step, but you should be able to figure it out by looking at the next couple pictures.)

Step 2 : CUT & RIP AGAIN.   Cut little slits about an inch apart all the way down the long size of the 12 inch pieces.  Then tear each slit stopping about 2 inches from the edge.  When I first started ripping I actually put a piece of masking tape down the edge where I wanted to stop so I didn't rip too far.  


 This is the difference between ripping with the grain and against the grain.  
It gives different textures to the gorilla  fur. 

Rip until you have a pretty good sized pile.  It will take a lot more than you think!

Step 3: GLUE PANTS.   Starting at the bottom edge of one of the legs, begin to hot glue the solid edge of the ripped strips onto the pant leg.   Begin with the first strip a couple inches from the bottom, letting some hang over the edge. When gluing the strips of ripped fabric, do not glue more than a 6-8 inch strip on at a time and leave a little space between the end and beginning of each new strip. If you run a continuous line of glued strips, the sweatpants will loose their stretch and the person wearing them may not be able to get them on, especially around the hips and butt.


Continue gluing the strips of ripped fabric around the leg and moving up a layer at a time.  The layers can be an inch or two apart, but try not to leave too big of a space between rows.  You  want the gorilla fur to look "full" so also alternate between the stips that were ripped on the grain and against the grain.  Mix it up, in the end it will look great!


Glue up and around each leg.  When you get to the crotch you will want to continue to glue the strips but sort of give the last strip or two on each leg an angle 


Then glue on  a short strip that connects the angles.

Now continue to glue strips of ripped fabric all the way up the front and back of the pants ending with the top row just below the waistband. Again, be sure to leave a little space between strips so not to loose the stretch of the pants.


Step 4: PREPARE BODICE.  Cut off the sleeves off the sweatshirt (or loose fitting t-shirt, which ever you choose)  and also cut the shirt to make it cropped.  


Step 5: GLUE BODICE.  I did not make any of the gorilla tops, but the idea is the same. Start at the bottom of the shirt and beginning gluing the ripped strips in the same manner you did the pants, moving up and around the shirt.

The fitted t-shirt  goes under the gorilla bodice to represent the fur-less stomach of a real gorilla.
Here is Patrick putting on gorilla make up.


Teased and messed up hair looks great.  Also we added colored sheets to the gorillas who had  more significant parts in the musical.


* Note:  Be sure to check out my post on CAMP TARZAN for more jungle ideas. http://grassybranchfarms.blogspot.com/2013/05/camp-tarzan.html


Tuesday, August 6, 2013

Best Zucchini Muffins Ever!


 **from garden to table - whenever I am able!**


I was searching far and wide trying to find a zucchini muffin recipe that was not dry....and to be honest I was getting very frustrated with all the time and zucchini I was wasting on my quest.   Then one day my dear friend Susan shared her family recipe.  It was delicious and I was thrilled!

I have altered her recipe a little by adding a 1/2 cup of sour cream, making it even more awesome.  If you prefer to loose the extra calories, it is still a great recipe even without the sour cream.

Zucchini Muffins
(makes 24 muffins or 2 loaves)

1 cup oil
2 cups sugar
3 eggs
3 tsp vanilla
3 tsp cinnamon
1 1/2 tsp baking soda
1 tsp salt
1/2 cup sour cream
3 cups flour
2 cups fresh grated zucchini
(I grate it whole, skin on and seeds in, with my cheese grater)

I mix the first 8 ingredients together and beat with my hand mixer.

Then I blend in the flour and zucchini with a wooden spoon.  Pour into cupcake wraps or greased muffin tins. Bake at 350 for 20 minutes.


So delicious fresh out of the oven!

Thursday, June 27, 2013

Grandma's Shortcake

This is one of my favorite summer recipes when fresh fruit is available.  This isn't your everyday store bought shortcake.  This is Grandma's homemade shortcake.....one of those recipes that has been passed down from generation to generation.  When I asked my mother-in-law for the recipe she had to kinda calculate ingredient measurements for me because it is one of those recipes that she would just throw together. 


You will love this shortcake - it is even good without berries!


Grandma's Shortcake
2 c. flour
2 tsp baking powder
2/3 c. sugar
2/3 stick softened butter or margarine 
(note: 2/3 stick, not cup)
2/3 c. milk


Mix all ingredients together. Spread in greased pie plate. Bake 350 for 1/2 hr or until golden brown and toothpick comes out clean.


Yummy!  We love this shortbread fresh out of the oven with fresh berries and vanilla bean ice cream - summer doesn't get any better than that!