This year my daughter's high school did the Disney Musical Tarzan. It was one of the first high school productions of Tarzan in Ohio and it was quite spectacular! The talent, costumes and stage design were amazing. The director is incredible. She has vision and isn't afraid to tackle the unknown, plus she includes everyone that tries out. It was a cast of 80 and everyone had a great time.
One of the ideas the director had was to provide a "pre-show" event prior to the Saturday evening performance and she asked me to head it up. The event would serve as a way to draw children to the show as well as help raise some funds to pay for the production.
As we were brainstorming for the event, someone threw out the idea of trying to get the Columbus Zoo to come and bring some "jungle" animals. It was a long shot, but we started making the connections and before we knew it, the zoo was booked and they were even donating their presentation to help us out.
Once we had the zoo lined up I had to think how to best organize the rest of the event so it wouldn't be utter chaos. Considering we were going to have 150 young children plus parents and grandparents, I thought the best way to handle the crowd was to design the event much like a carnival. Thus, I began coming up with "jungle" type carnival activities and lining up volunteers.
The musical itself began at 7:30pm in the high school auditorium. Camp Tarzan was held in the gym (which was right across the hall from the auditorium) and tickets had to be purchased in advance. The zoo did their presentation from 5:30-6:00pm with the carnival activities running from 6:00-7:00pm. We charged $5.00 per child.
The entry way to the gym was decorated with ripped up sheets, ivy and paper flowers. I had photo boards for kids to stand behind for a photo ops and jungle music playing in the background.
When the kids arrived at the entrance they were each given a brown bag with a checklist of activities on the front. The checklists were in different order on the bags so that not everyone started at the same activity.
The Columbus zoo was definitely the highlight!
 |
| They brought a penguin |
 |
| and a sloth |
 |
| and an armadillo |
 |
| .......a big yellow snake |
 |
and my favorite, a snow leopard
The Jungle Carnival
|
When the zoo was done with their presentation the kids were instructed to try and go to the activities in the order listed on their bags. This helped keep the kids spread out at different activities so no one had to wait too long in line. Jungle type prizes were given out at all of the activities except those in which the kids made something (such as the binoculars and necklaces)
Jungle Snack Necklaces: Kids laced Fruit Loops and pretzels on a string that was threaded with a plastic lacing needle
Binoculars: I made binoculars out of toilet paper tubes and let the kids decorate them with jungle stamps, markers and jungle stickers. It was so fun to see the kids use them during the musical.
Swamp Fishing: We decorated one of the schools ticket booths to look kinda "swampy." The kids dropped a fishing line, with a clothes pin on the end, behind the booth. A volunteer sat in the ticket booth and attached prizes. Prizes for this booth included plastic snakes, frogs and jungle tattoos.
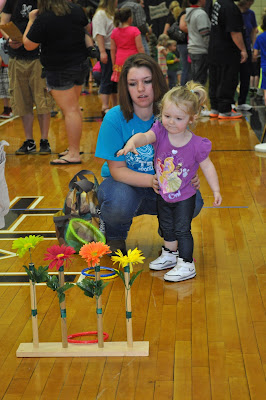
Jungle Flower Ring Toss: This was a last minute game. I was at the thrift store and found 2 of these peg boards. Not sure what they were originally for, but they worked perfect for a ring toss game. I attached flowers to the pegs with green electrical tape and provided swim pool diving rings for the kids to toss.
Pin the Tail on the Monkey: This is pretty self explanatory I painted two monkeys on white paper. The kids were blindfolded and had to try and "pin" the tail on the monkey. The tail was a fluffy boas I bought at the dollar store. I cut it in half to make 2 tails then wrapped the end with electrical tape. Large glue dots were placed on the end so the tail would "pin" to the monkey.
Wild Animal Toss: I used the school's batting screen for this game. We decorated the screen with ripped sheets. The screen had an opening perfect for tossing stuffed animals through. Since my kids are out of the stuffed animal phase I went to the thrift store and picked up stuffed monkeys, lions, gorillas, etc. to toss.
Tree Frog Throw: I made a large tree out of brown paper and leaves that I ordered from Oriental Trading Co. The kids tossed a sticky frog at the tree trying to get it to land on a leaf.
Elephant Peanut Push: The kids had to push a peanut (in the shell) using a swim noodle, down a path marked on the floor with painters tape. At the end of the path was a bushel basket laid on its side that the kids had to push the peanut into.
Banana Guessing Game: I ordered banana runts online and filled 3 jars, each with the same amount of bananas. Each child could guess one time. Since all 3 jars had the same amount, it made it easier and gave us the opportunity to announce 3 winners. The winners were announced during the musical intermission. Their prize was the jar of bananas.
Tarzan Swing: This worked so well! A rope was tied to the poles of the basketball hoops. The kids had the opportunity to swing like Tarzan. I had tumbling mats on the floor and an adult supervising at all times.
Face Painting: What is a carnival without face painting? I had art students and some cast members do the face painting. Some had butterflies, snakes and monkeys painted on their faces, while others went all out and got leopard spots. Too Cute!
Jungle Obstacle Course: This worked really well too. The kids went 2 at a time. I set up an obstacle course by taping paper logs to the floor, used a towel as quick sand, a 2x4 as a fallen tree and field tile (we had in the barn) as a cave. They were given a monkey they had to carry around their neck throughout the obstacle course.
They started by hopping from log to log, jumping over the quick sand, walking down the fallen tree....
........then crawling through the cave.
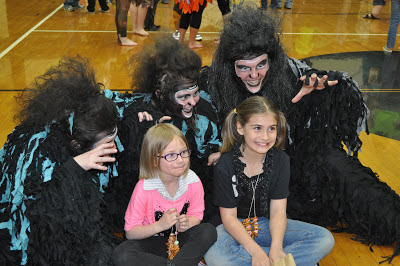
Character Photo Ops: We had members of the cast roaming around the carnival greeting the kids and posing for pictures. We did this because we wanted to make sure the kids were not afraid of the cast since some of the costumes were pretty intimidating to a young child.
 |
Even the school superintendent posed with a group of cast members.
Although it was a lot of work to coordinate it was a grand success. Everyone had a great time and we made a little money as well.
|


