Tuesday, October 30, 2012

The Drought of 2012

This year our country experienced one of the worst droughts of our lifetime.  Yes, it was hot and dry and miserable for the average person.  Everyone seemed to complain a little, well, maybe a lot.  Even tough we complained, we knew rain would eventually come and the seasons would change  (and boy did the seasons change - it's the end of October and we have snow already!)

During those hot, miserably dry days of summer, did you ever stop and think about how the drought would effect you and your family in the long term?  Those who make their living off the land - raising crops and livestock - sure did.

Every spring we (farmers) plant our crops and pray that God blesses us with the needed rain to germinate the seeds and grow our crops.  Farmers are people of great faith.  You see, once a farmer plants his seeds he has to rely on God to provide the sun, rain and warm temperatures necessary for the seeds to grow.  Of course the farmer must continue to care for the crop as it grows - helping to nourish it with fertilizer and keep weeds from choking and stealing nutrients. But they must still depend on God for the proper weather to make it all work.


So what did this years drought do to the crops?  Take a look at the following pictures of field-corn and see for yourself.


These ears of field-corn are typical of a good crop - full ears, even kernels, at least 8 inches in length. 
These ears of corn were harvested from a crop planted in rich black soil which is better able to hold water. This type of soil is still able to produce some pretty typical ears of corn even in a drought.  
A field with ears of corn like these will produce enough food to feed our family plus about 150 other people around the world.


This corn is typical of drought damaged corn.  These ears were harvested from a field of corn planted in clay soil which has very limited water holding capacity, so in times of drought the corn is very stressed and unable to grow properly. 
A field with these ears of corn will barely produce enough of a crop to feed my family. 


Although many farmers had significantly less crops to harvest this year, we are Blessed as a nation,even in a drought year, to be able to still feed our country and the world. 

While we may have to pay a little more for food this year, there will still be enough to go around.  

Be sure the thank a farmer today!


Thursday, October 25, 2012

Recycled Gift Tags

Home made gift tags - super easy and cheap too!

Pin It

Another great garage sale find -  a set of cards from a Rolodex. When I saw them at the sale I immediately thought of "gift tags."   I paid 25 cents for a bundle of about 100 cards. 


To make the cards a little more interesting I decided to coffee stain them.  It is fairly simple.  I mixed up a batch of instant coffee and quickly dipped each card in the coffee.


I placed the cards on a microwave safe dish.  Layering them is fine - I try and get as many done at one time as possible.


Microwave on high for a minute. The edges will begin to curl as they dry. 

After a minute I flipped them over and put them back in the microwave for another 30 seconds (be careful they will be hot and steamy).   I continued to microwave them in 20-30 second intervals until they were almost totally dry.

Now the fun began.  My friend Anne and I gathered up a variety of scrap-booking supplies and headed over to visit our friend's sister, Wanda,  who was home bound after having ankle surgery.  We spread out the supplies and went to town creating a variety of gift tags.  Once we came up with a design we developed an assembly line to make the process go more quickly.

Here's what we came up with.....

Pin It


In just a few hours we made over 150 gift tags and we helped Wanda's afternoon go more quickly. 


Pin It


As an after thought, Anne made some of her tags into cards!  Love it!


Monday, October 15, 2012

Roasted Pumpkin Seeds - salty, crunchy and oh, so addictive!

It always surprises me how many people have never made pumpkin seeds.  I think it is just wrong to carve open a pumpkin and throw away all those glorious, yummy seeds. We love them so much  I always buy extra pumpkins just so we have more seeds to eat.

Yes, it is a gooey, yucky task, but ohh so worth it!

Here is my recipe for pumpkin seeds.

Supplies:  baking sheet, EVOO, sea salt, wash pumpkin seeds, pre-heat oven to 400.

After collecting all the pumpkin seeds from your jack-o-lantern, rinse them in a colander, trying to get as much of the goo off as possible. Let them drip for a few minutes while you prepare your baking pan.
Place about 2 Tablespoons of EVOO on the pan and spread it around.  Dump the washed seeds on the pan and gently toss in the EVOO.  Generously sprinkle with sea salt.   Place in the middle rack of your oven.  Bake for 20 -30 minutes.  Check on them a couple times.   Stir them around a little and add some more sea salt and continue to bake until they turn a nice golden brown and look dry and crispy.  Store in a Ziploc bag or air tight container.

Yumm!  One of our favorite fall snacks!


Pin It

Thursday, October 11, 2012

Softball Wall Flower

Last year I found this little project in an issue of Flea Market Style magazine.  I have held onto the magazine waiting for the perfect opportunity to make one.  I liked it so much I wanted to share the project, so my friend Janelle and I decided to offer it as one of our classes at Sugar Creek Homestead.
Pin It


Supplies needed:
3 used softballs or baseballs (each flower requires 1 1/2 balls)
decorative button or object for the center
hemp or heavy thread
hot glue

Tools needed:
pointy scissors
nail or sharp object to pierce holes 
heavy duty sewing needle


Step 1.  Clip the thread on the balls. Pull skin off the center. Remove threads.

Step 2:  Layer 3 skins, centering them to make the petals equal distances. Punch  2-4 holes (depends on how many holes you have in your button)  in the center of the skins.  Be sure to punch through all the layers.


Step 3: Sew skins together with heavy thread.
I started going down through the top, being sure not to pull the thread all the way through,
 then back up through to the front.


It should look like this. Leave the thread long enough to lace through the buttons.


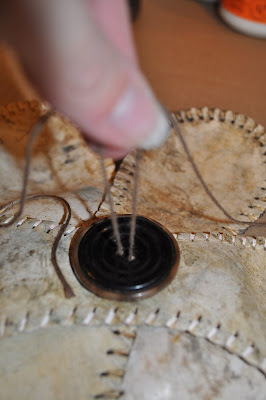
Step 4: Attach button and tie the thread in a square knot.  Trim the thread.


Step 5: Finishing touches. You can hot glue your flower onto any type of board. I used rusty, twisted baling wire to represent the leaves and stem of the flower.  To attach the wire, I drilled holes into the wood, just deep enough to set the wire in, then used hot glue to help hold the wire in place. The magazine also suggests framing the flower, attaching it to a hat or tote bag, or adding a wire stem and place it in a vase.


Here are some pictures from our class.


For the class, the ladies put their softball flowers on old door panels we picked up at the flea market. The paint on the panels was perfectly old and chippy. 
Such a beautiful display of flowers!